Hello guys! My name is John, and I’m excited to share my first blog post on Musing in Economy, where I’ll be exploring topics related to economics, technology, and more. As someone with a technology background, my goal is to learn and share economic and technology concepts that are interesting and engaging.
Today, I’ll be walking you through the process of starting your own blog, from registering a domain to setting up your WordPress site. Let’s dive in!
Step 1: Register a Domain with Porkbun
Your domain name is your blog’s online address, so it’s crucial to choose one that reflects your brand and is easy to remember. Porkbun is a popular domain registrar known for its affordability and user-friendly interface.
- Go to Porkbun and search for the desired domain name.
- Choose your preferred domain extension (.com, .org, etc.), and add it to your cart.
- Complete the registration process by providing your contact information and payment details.
Step 2: Onboard to Cloudflare with a Basic Rate Limiting Rule
Cloudflare can help protect your website from DDoS attacks, improve performance, and provide additional security features.
- Sign up for a free Cloudflare account.
- Add your website by entering your domain name.
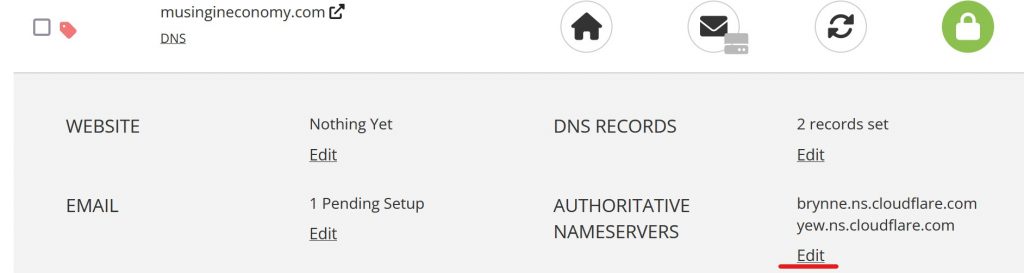
- Follow the instructions to update your domain’s nameservers in Porkbun console.
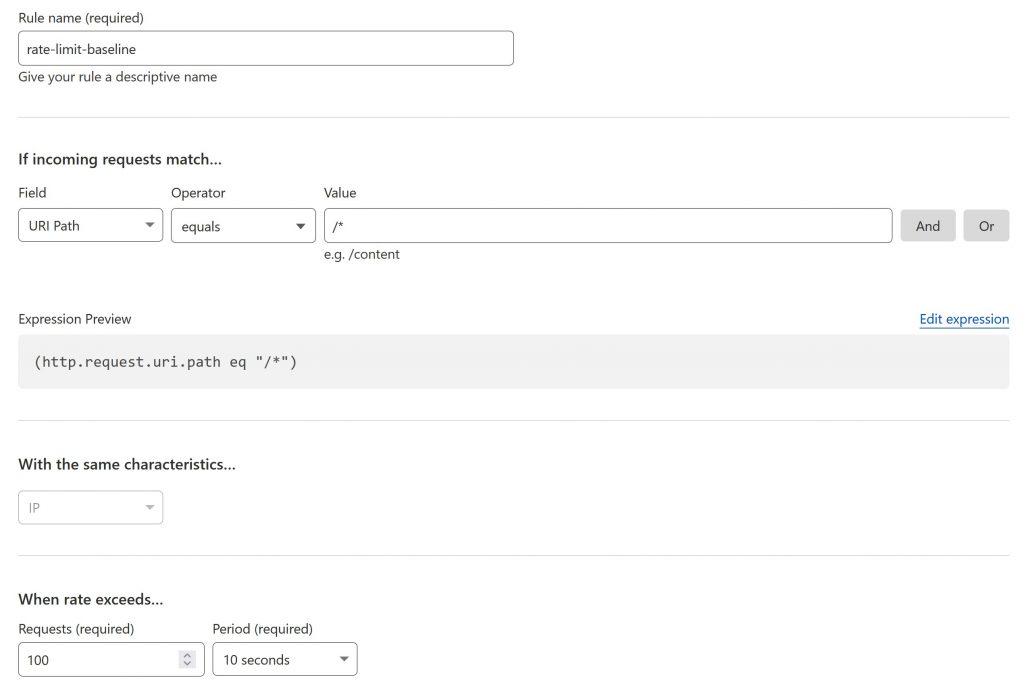
- Go to Cloudflare Dashboard > Security > WAF, set up a rate limiting rule to protect your site from excessive requests or DDoS attacks.
Step 3: Rent a WordPress VPS from Hetzner
Hetzner offers affordable VPS hosting options for WordPress users. To rent a WordPress VPS, follow these steps:
- Visit Hetzner and create an account.
- Choose a VPS plan that fits your needs, considering factors like storage, RAM, and CPU power. Add an IPv4 address for the sake of convenience.
- Install WordPress on your VPS using Hetzner’s one-click WordPress installation option or by following their detailed installation guide.
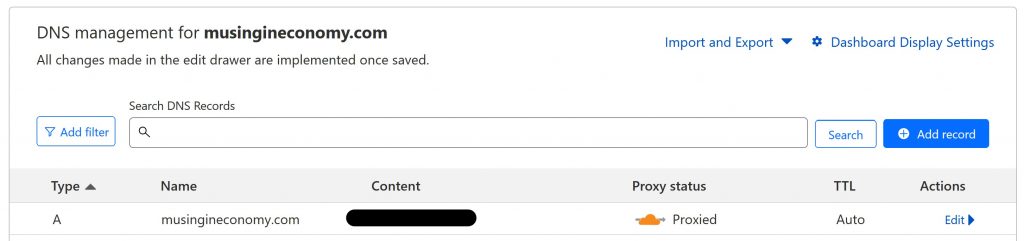
- Go to Cloudflare dashboard and configure a DNS A record pointing your domain to your Hetzner IPv4 address, proxied by Cloudflare.
Step 4: Set Up Astra with a Basic Theme
Astra is a lightweight, customizable theme for WordPress that makes it easy to create a professional-looking blog.
- In your WordPress dashboard, go to Appearance > Themes.
- Search for the Astra theme, install it, and activate it.
- Customize your blog’s appearance using Astra’s built-in options or by importing one of their starter templates.
Step 5: Utilize ChatGPT-like Services for Assistance and Troubleshooting
AI-powered tools like ChatGPT can provide valuable assistance when writing blog posts or troubleshooting technical issues.
- Sign up for a ChatGPT-like service, such as OpenAI’s GPT-powered offerings.
- Use the AI assistant to generate content ideas, proofread your writing, or answer questions related to WordPress and blogging.
Step 6: Google Analytics for WordPress by MonsterInsights
Monitoring your blog’s performance is crucial for understanding your audience and making data-driven decisions to improve your content strategy. Google Analytics is a powerful tool that provides insights into user behavior, traffic sources, and much more. To easily integrate Google Analytics with your WordPress site, consider using MonsterInsights.
MonsterInsights is a popular and user-friendly WordPress plugin that allows you to connect your Google Analytics account to your website without having to edit any code. With MonsterInsights, you can access essential analytics data directly from your WordPress dashboard and take advantage of advanced tracking features.
To get started with MonsterInsights, follow these steps:
- Install and activate the MonsterInsights plugin in your WordPress dashboard by navigating to Plugins > Add New and searching for “MonsterInsights.”
- Once activated, go to Insights > Settings in your dashboard to start the setup process.
- Connect your Google Analytics account by following the on-screen instructions. You’ll need to provide the plugin with the necessary permissions to access your Google Analytics data.
- After connecting your account, choose the appropriate tracking options and configure any advanced settings you may need, such as events tracking or eCommerce tracking.
- Save your settings and let MonsterInsights handle the tracking process for you.
Step 7: Registering Your Domain in Google Search Console
To ensure your blog is properly indexed by Google and to gain valuable insights into its search performance, it’s essential to register your domain with Google Search Console. Registering your domain allows you to monitor your site’s indexing status, submit sitemaps, and receive notifications about potential issues.
Follow these steps to register your domain in Google Search Console:
- Visit Google Search Console and sign in with your Google account. If you don’t have an account, create one for free.
- Click “Add Property” and select the “Domain” option. Enter your domain name (e.g., yourdomain.com) and click “Continue.”
- Verify your domain ownership by following the provided instructions. Don’t worry, Google Search Console has a nice integration with Cloudflare for one-click verification that takes a couple seconds to finish.
- Once your domain is verified, Google Search Console will start collecting data about your website. It may take a few days for the data to appear.
Step 8: Handling Sitemap
Creating and submitting a sitemap is an essential step to help search engines like Google crawl and index your blog efficiently. One of the easiest ways to generate a sitemap for your WordPress website is by using the Sitemap Generator plugin. In this section, we’ll walk you through installing the plugin and submitting your sitemap to Google Search Console.
Step 8-1: Install Sitemap Generator for WordPress
- Log in to your WordPress dashboard and navigate to Plugins > Add New.
- In the search bar, type “Sitemap Generator” and look for the plugin by Auctollo. Click “Install Now” and then “Activate” once the installation is complete.
- After activating the plugin, go to Settings > XML-Sitemap to access the plugin’s settings.
Step 8-2: Access and Review Your Sitemap
- After configuring the plugin, your sitemap will be generated and available at https://{{your_domain}}/index.php?xml_sitemap=params=. Visit this URL to view your sitemap and ensure it includes all the necessary content from your website.
- The sitemap should list all the URLs with their last modification dates and priority levels. Review the sitemap to make sure it accurately represents your website’s structure.
Step 8-3: Submit Your Sitemap to Google Search Console
- Sign in to your Google Search Console account. If you haven’t already, add and verify your website as a property.
- Navigate to the “Sitemaps” section in the left menu. In the “Add a new sitemap” field, enter the URL of your sitemap (e.g., https://{{your_domain}}/index.php?xml_sitemap=params=) and click “Submit.”
- Google Search Console will process your sitemap and display the status. It may take some time for the sitemap to be processed and for the indexed URLs to appear in the report.
I hope this guide has given you the confidence and knowledge to embark on your own blogging journey. Stay tuned for more insights, tips, and discussions on Musing in Economy. Happy blogging!